

Get Started Astro Tutorial — 10. Automatic Deployment with Astro and Content Island using GitHub Actions
- 1. Creating the project in Content Island
- 2. Defining the data model
- 3. Adding data
- 4. Creating the Astro project
- 5. Creating the folder structure
- 6. Connecting Content Island with Astro
- 7. Building the About page
- 8. Page with list of posts
- 9. Displaying a post
- 10. Automatic Deployment with Astro and Content Island using GitHub Actions
- 11. Deploying to Netlify
- 12. Auto-deploy with GitHub Webhooks + Content Island
10. Automatic Deployment with Astro and Content Island using GitHub Actions
GitHub Pages is a web hosting service offered by GitHub to its repository users. Additionally, this service is free for public repositories, making it an excellent option for hosting projects.
In this example, we will see how to deploy the "Get Started Astro" project by Content Island to GitHub Pages.
Step 1: Create a Repository
The first thing we need to deploy this project is a GitHub repository:
- Open your account on GitHub and create a new repository.
- Give it a name.
- Make it public to use it for free.
- Click the create button without adding any files.
Copy the URL of the repository you just created and clone it to your computer in an empty folder using the following command:
git clone <repository URL> .Put a period at the end so that git does not add an extra folder with the repository name.
Now, having cloned the repository with the Astro project, simply copy the contents of the blog-site folder to the one you just created and upload it to the repository with the following commands:
git add .
git commit -m "Initial commit"
git push
You can see that the project is now uploaded to your GitHub repository.
Step 2: Configure Deployment
To configure the deployment on GitHub Pages, we need to create a workflow in GitHub Actions. To do this, create a .github/workflows folder in the root of the project and add a file with any name you want. I will name it deploy.yml with the following content:
- Give the workflow a name, which will help us identify it later on GitHub.
- Indicate when it will run, in this case, every time we push to the
mainbranch. - Define a
jobcalleddeploythat will run on an Ubuntu virtual machine. - Since this virtual machine does not have the source code of our project, the first step is to clone the repository, just like we did on our local machine. To do this, use a predefined GitHub Actions action called
actions/checkoutand use version 4. - Install the necessary dependencies with the
npm cicommand, which uses thepackage-lock.jsonfile. - Execute the build.
- Upload the build result to an artifact using a GitHub Actions action called
upload-pages-artifactand specify the folder to upload. - Finally, use the
deploy-pagesaction to deploy the artifact to GitHub Pages. As indicated in the official documentation of the `deploy-pages` action, it is important to add write permissions forid-tokenandpages.
./.github/workflows/deploy.yml
name: Deploy to GitHub Pages

on:
  push:
    branches:
      - main

permissions:
  pages: write
  id-token: write

jobs:
  deploy:
    runs-on: ubuntu-latest
    steps:
      - name: Clone repository
        uses: actions/checkout@v4

      - name: Install
        run: npm ci

      - name: Build
        run: npm run build

      - name: Upload artifact
        uses: actions/upload-pages-artifact@v3
        with:
          path: ./dist

      - name: Deploy
        uses: actions/deploy-pages@v4
Before pushing, it is important to configure a couple of things in the project.
On one hand, if we go to the Settings section of the repository, in the Pages section, we can see that by default it is configured to deploy from a branch. We need to change it to enable deployment from GitHub Actions.
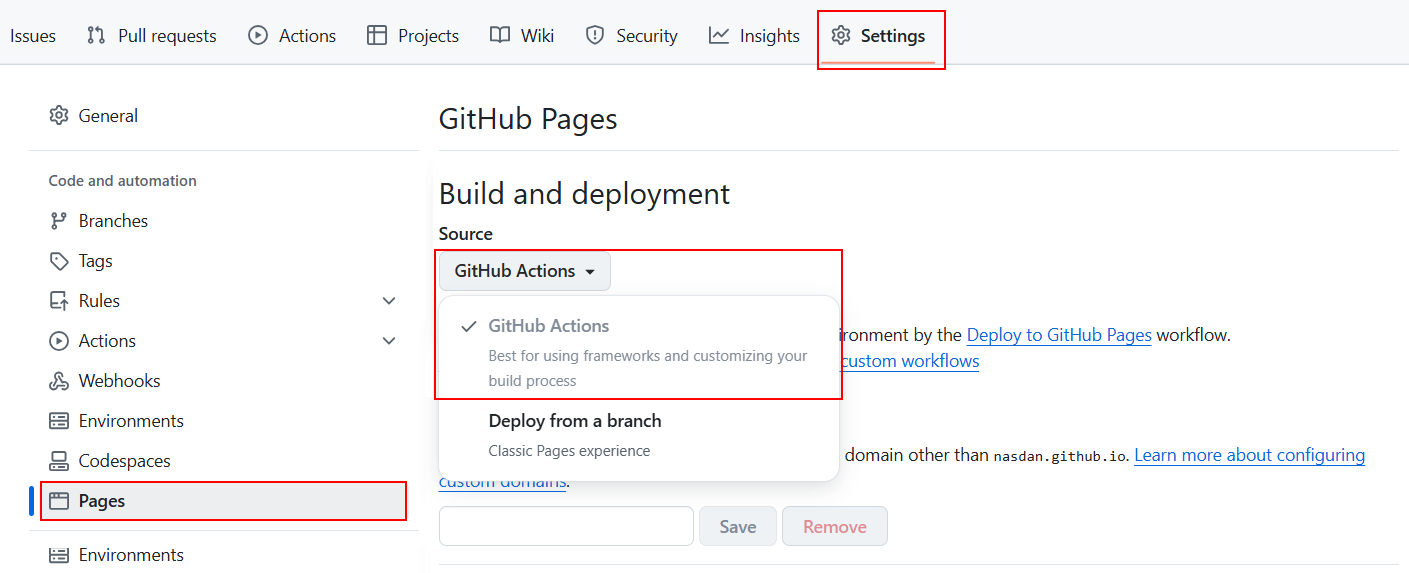
On the other hand, remember that when the project build is executed, it connects to our Content Island project to retrieve the data for each Post, so we need to configure the CONTENT_ISLAND_SECRET_TOKEN environment variable in the GitHub repository. To do this, go to Settings > Secrets > Actions > New repository secret and add the variable, obtaining the value provided by Content Island in the General tab.
Now that we have this secret, use it as an environment variable in the deploy.yml file:
./.github/workflows/deploy.yml
name: Deploy to GitHub Pages

on:
  push:
    branches:
      - main

permissions:
  pages: write
  id-token: write

+ env:
+   CONTENT_ISLAND_SECRET_TOKEN: ${{secrets.CONTENT_ISLAND_SECRET_TOKEN}}

jobs:
  deploy:
    runs-on: ubuntu-latest
...
Now, commit and push to the repository and wait for the workflow to execute.
git add .
git commit -m "add workflow"
git push
Step 3: Display Deployed URL
As we can see, the process has completed successfully, but we don't know the URL where it was deployed. This URL can be found in the Settings > Pages section of the repository.
If we want the URL to appear in the workflow itself when it finishes, we can update the deploy.yml file:
- Identify the
deploystep with anid. - Add an
environmentwith any name you want and the URL provided by thatstep.
./.github/workflows/deploy.yml
...

jobs:
  deploy:
    runs-on: ubuntu-latest
+   environment:
+     name: github-pages
+     url: ${{ steps.deploy.outputs.page_url }}
    steps:
      - name: Clone repository
        uses: actions/checkout@v4

      - name: Install
        run: npm ci

      - name: Build
        run: npm run build

      - name: Upload artifact
        uses: actions/upload-pages-artifact@v3
        with:
          path: ./dist

      - name: Deploy
+       id: deploy
        uses: actions/deploy-pages@v4
Now, if we push to the repository again, we will see that the URL where it was deployed appears at the end of the workflow.
git add .
git commit -m "add environment"
git push
Step 4: Issue with Base URL
Although it seems that everything is ready, if we navigate to any post, we will see that it does not display correctly. This is because by default, GitHub Pages uses the repository name as the base URL where the application is deployed. In other words, if you deploy multiple applications with the same GitHub account, each one will be deployed to a different path (each with its repository name), but they will all share the same domain (<username>.github.io).
To solve this problem, Astro allows us to configure the `base` property both in the astro.config.mjs file and from the command line. If we modify this property, it is necessary to use the import.meta.env.BASE_URL environment variable when navigating to a route in any href.
Therefore, let's update the build step of the workflow:
- Now, we need to pass an extra option to this command, so we use the double hyphen
--to pass all the arguments we want. In this case, the--baseargument and as a value, we need the repository name. - If we want this
workflowto be as generic as possible to serve any project, we can use theconfigure-pagesaction from GitHub, which provides the base URL of the project as output.
./.github/workflows/deploy.yml
...

      - name: Install
        run: npm ci

+     - name: Setup Pages
+       id: pages
+       uses: actions/configure-pages@v5

      - name: Build
-       run: npm run build
+       run: npm run build -- --base "${{ steps.pages.outputs.base_path }}"
...
Next, update all the href attributes in the project to use the import.meta.env.BASE_URL environment variable as the base URL:
Update the index.astro file:
./src/pages/index.astro
...
    <ul class="posts__list">
      {
        posts.map(post => (
          <li>
            <article class="post">
              <a
-               href={`/posts/${post.title
+               href={`${import.meta.env.BASE_URL}/posts/${post.title
                  .toLowerCase()
                  .trim()
                  .replace(/[^a-z0-9\s-]/g, '')
                  .replace(/\s+/g, '-')}`}
              >
                <Image
                  src={post.image.url}
                  alt={post.image.name}
                  width={250}
                  height={100}
                  class:list={'post__image'}
                  loading="eager"
                />
              </a>
              <div class="post__text">
                <div class="post__header">
                  <p class="post__date">
                    <time datetime="2025-03-05">{date(post.date)}</time>
                  </p>
                  <a
-                   href={`/posts/${post.title
+                   href={`${import.meta.env.BASE_URL}/posts/${post.title
                      .toLowerCase()
                      .trim()
                      .replace(/[^a-z0-9\s-]/g, '')
                      .replace(/\s+/g, '-')}`}
                    class="post__title"
                  >
                    <h2>{post.title}</h2>
                  </a>
                </div>
                <div>
                  <p class="post__description">{post.summary}</p>
                </div>
              </div>
            </article>
          </li>
        ))
      }
    </ul>
...
And the Header.astro file:
./src/components/Header.astro
<header class="header">
  <nav class="menu">
    <ul>
      <li>
-       <a href="/" class="menu__item"> CurioVerso</a>
+       <a href={import.meta.env.BASE_URL} class="menu__item"> CurioVerso</a>
      </li>
      <div class="menu__right">
-       <li><a href="/" class="menu__item">All Post</a></li>
+       <li><a href={import.meta.env.BASE_URL} class="menu__item">All Post</a></li>
-       <li><a href="/about/" class="menu__item">About</a></li>
+       <li><a href={`${import.meta.env.BASE_URL}/about/`} class="menu__item">About</a></li>
      </div>
    </ul>
  </nav>
</header>
...
You can now push to the repository again and check if it works correctly.
git add .
git commit -m "fix base url"
git push
And that's it! We now have our Content Island and Astro project deployed on GitHub Pages.